
What are the Instagram story dimensions?

Many Storrito users asked us: what is the optimal resolution for an Instagram story? Therefore we’ve summarized all the important details in this blog post.
Image dimensions
If you like to create a story image in Photoshop (or another tool), you should use these dimensions to achieve the highest quality on Instagram:
Width: 1080 px
Height: 1920 px
Consequently the aspect ratio is: 9:16
Video dimensions
For videos we recommend these dimensions:
Width: 720 px
Height: 1280 px
The video format should be mp4 (9:16 aspect ratio, 30 fps, h264, yuv420p).
Beware of the Instagram controls
Choosing the right dimensions is not the only challenge, since the Instagram app overlays your story with a few controls for the user, below marked in red:
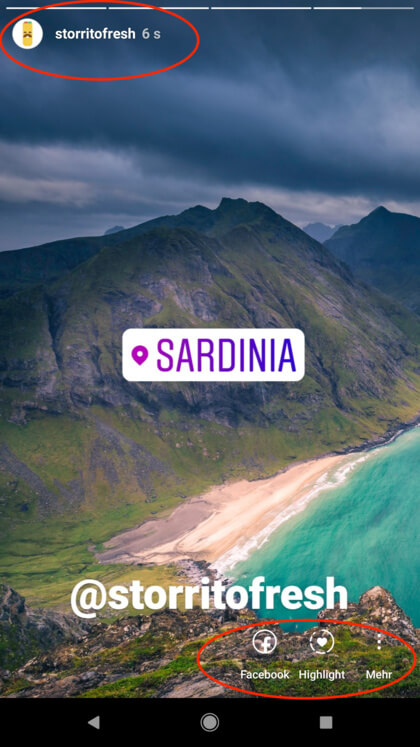
Ideally you have an overlay in your Photoshop file that shows the Instagram controls, to avoid that important elements of your design will be covered by the Instagram controls.
Last but not least you also need to plan in advance that other Instagram elements (like the usertag and the geotag in the screenshot above) will not interfere with your design, when you add them later via the Instagram app.
What a mess
You see there are many subtleties, when it comes to create a design for an Instagram story. All the things described above happened regular, when we designed Instagram stories in the past. Therefore we created Storrito to solve the biggest pain points, when you like to create an Instagram story quickly on your desktop PC, Mac or laptop.
An easier way
Let my show you the main steps it takes to create an Instagram story with Storrito.
After you’ve created your Storrito account here:
You click the Choose a file to upload button (see green arrow)

When the upload is done, your image or video appears in the Storrito gallery. Just click on the image to open the menu:

In the menu click Edit this image to open the story editor:

The story editor directly shows the Instagram story dimensions. I’ve marked the corners of the story with the four little green arrows. As you can see the image almosts fits into the story area. All parts outside of this area are semi-transparent and will not be visible in the Instagram story:

But we want to have a section of the image that shows more of the beautiful beach. Therefore you can move the image or click its corners (see green arrow) to resize it, like I did below. You can also rotate the image (see blue arrow)

By clicking on the blue round “Add” button you can add more elements to your story. As you can see Storrito also supports Instagram’s hashtags, usertags, location-tags and polls:

Storrito makes even more convenient :-) After you’ve saved your story
by clicking on the red round “Save” button. You can directly post your
story to your Instagram account (click on Post now) or schedule it
for a later point in time (see green arrow).
If you didn’t connect an Instagram account yet, then the screen below will show a button, where you can connect your Instagram account to Storrito.

However if you like to post it manually, you can also just download
the image or video by clicking the Download button (see blue arrow).
I’ve also covered the whole topic in the tutorial video below:
If there is anything missing, we are happy to help. Just click on the red circle in the lower right corner of this webpage to reach out to our support team.